We are grateful for our lovely followers

Follow on Bloglovin

Google Website Translator Gadget

Monday 28 December 2009

Challenge #11 - Favourites of 2009


I hope you all had a wonderful Christmas and are recovering! Many thanks for your entries for our previous sketch challenge, such beautiful works! Its been a busy hectic time for everyone so I thank you for taking the time to join us! Also a big thank you to Debbie Dolphin for being our special guest and to Donna's Den of Crafts for the £10 voucher!

As we had a very quiet week as did most of blogland I'd like to award the Top 3 to ALL entrants because I know how hectic it was and as a thank you for taking time out to join us so that is...

Vicky, Cheryl, Kazabing, Caro, Beverley, Susan & Sue! Well Done ladies x


Donna's also shown me a new toy so I'm using it for the first time now :D


The winner of Donna's Den voucher is....CHERYL!


Please email me so I can arrange your voucher x


There were 7 items in your list. Here they are in random order:
cheryl
sue
vicky
susan
beverley
kazabing
caro
Timestamp: 2009-12-30 00:24:17 UTC


**********************************

CHALLENGE 11 - FAVOURITES OF 2009

This challenge is to think about what you've used this year, what has been your favourite products and/or techniques and more importantly why so please create something using products or techniques new to you this year. You can use one favourite or several the choice is yours but please do tell us which it is and why you think its the bees knees :)

Now if you're anything like me you may not have bought the item this year, it may have been in stash for a while until rediscovered and its become a new best friend!


Please post links to your entries in the comments box below by Monday 11th January 2010 at 12pm GMT.


We are sponsored again by Joanna Sheen who has such a huge assortment of craft items to suit all tastes in her online shop. Her newest items are more colours of memento inkpads, essential if santa brought you promarkers or copics! Meltdust powders and papers which is a fabulous new product for embossing computer printed images, I soooooo want some of these! There are lots of new CD's, the new promarker starter sets and the sought after Martha Stewart punches, go check them out!


Our ladies have been busy bees over christmas but have squeezed in some time to produce some creations for you for this challenge so thank you ladies for your time and wonderful creations x


This simple card uses a new stamp I've got which came in a set from Kodomo called Birds. I love these stamps they are so detailed (and cheap, Lol). I have stamped it with Brilliance Black, mounted it on silver and then layered it onto a piece of white card I ran through my faithful Cuttlebug with the Birds and Swirls folder. All is then mounted on a white card blank. The sentiment is a peel-off stuck onto a piece of silver card. As that cute little lemur says - simples!


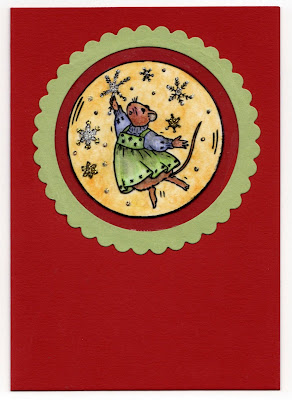
I used a pale cream coloured card which had a wavy side which is narrower on the front than the back, I added a silver Oval shape which had a similar wavy edge using double sided tape, and having used two of the circular flower stamps which I had bought from Studio24 and coloured them using watercolour pencils I stuck them onto the card using foam pads, finally I added some yellow stars on the inside of the card.


Judie


Well, this challenge was a good one, use your fav thing of 2009, mine without a doubt is my rippy ruler - I have used this so so much - so i have used two different baking papers which have been ripped with my faithful friend, A tilda image used, and some birthday ribbon, i have added some beads to give it a bit of bling as this is my sons girlfriends 18th birthday card. Thanks for looking everyone. Enjoy yourself xx


I decided to make this challenge using the promarkers I got for Christmas this year, I have also used the gorgeous brads and jewels I received from secret Santa!! The main technique of the card is matting and layering which is my favourite and the image is stamped and coloured using the promarkers (need a bit of practice !!) I added the brads and jewels for extra effect.


I've had lots of favourites this year - as I only started stamping earlier on in the year a lot of things have been 'new favourites' for me too, so it took me a while to decide what I'd use for this card! I've been quite hooked on Digistamp Boutique images so I chose one of their new ones, coloured with my favourite promarkers. The papers are Doodlebug, with DCWV cardstock. I've used some Green Tara flowers with a little button centre, and added a little butterfly sticker (mounted onto acetate and cut out) in the opposite corner. The fancy frame is made with Nellie Snellen circle dies, which have been a bit of an obsession for me for the last couple of months!


The favourite products I have used for this card are Clare Curd papers from Papermania and the Cuttlebug Butterflies dies. I have wanted those forever and have used them loads. The dotty texture used here is my favourite and looks great when used with sanded cardstock to distress it. Of course bling in any guise is a must too :). The central panel on this card was made by scoring a grid pattern and sewing a small bead at each intersection. It took ages to do but the results were amazing and worth the effort for a special card.


My favourite things for 2009 and also new to me were copics (May) and promarkers (August) and digital stamps (about the same time) and also the large bead caps used as flower centres, K&Co papers, beads and charms.
Image is Summer Fairy by The Greetings Farm coloured with copics and promarkers. I love the pastel green shades. Papers are K&Co sweet stack and My Minds Eye. The swirly stamp I've had for at least 3 years but its only got a run out this year and I used cut n dry foam to colour round the image with heritage shimmer inks, again I've had these years but only come out to play this year. The mulberry flowers and the beady strand I've also had at least 5 years or more but have had a new lease of life thanks to Tab Robinsons beautiful use of them on her blog. Sticky gems are my personal favourite and I use them on most cards! The big flowers I got from port sunlight show in October :)


Now may I have the pleasure of introducing our special guest designer for this challenge which is Vicky from Kip's Cards!


Vicky is a regular player on our challenges and keeps catching my eye not only for her beautifully creative work but also the photography surrounding the creation too, that is as much of a pleasure to look at as the card itself! Hop over to her blog and see more of her stunning creations, you wont be disappointed! Vicky also posts up tutorials from time to time so well worth checking back to see whats new! Thank You Vicky for being our special guest!


SPECIAL GUEST DESIGNER - VICKY - KIP'S CARDS


I started card making about three year's ago... I learned all my technique's from watching Create and Craft, I am a addict stamper and love all the programmes that involved stamping,and this challenge is about our favourite product's for this year and that for me is Copic Pen's... They have given me so many more option's...and make matching my project's so much easier... They take some practice, but since finding blogland, I have learned so much more...


EMAIL ENTRIES


By Rachel H

Thank You for entering this sweet card Rachel and I love the 3d flowers!

Monday 14 December 2009

Challenge 10 - A sketch

Photobucket

Gosh thank you for all your fabulous entries for our previous challenge, what a wonderful array of colours and stamps and many many thanks to Jo Capper-Sandon for being our special guest designer, do pop over to her blog as its always packed with fantastic creations & great ideas.

Also thank you once again to the delightful Joanna Sheen for sponsoring us again!

A bit later than expected as I've had FLU! OMG I havent had a flu in years just bad colds so I've been behind on visiting everyones blogs and posting winners. All done now so without further ado here's the winners....
We had 70 entries to our Alternative Xmas challenge and the voucher winner is...

18 - CraftyC (Claire)

Well Done Claire, please email me your details to have the voucher sent to you x

Winners of the Top 3 blinkies chosen by the team go to.....

Chelsea - Crafting Life's Pieces

Dawn - Craft Addiction

Cheryl - Ch3rrie's Creations

Well Done ladies, such a varied choice this time too! Please grab yourself a Top 3 blinkie from the sidebar, lovely work x


Just a quick note about entry comments. I've had to change the settings to blog owner approval because of spam being posted on the last challenge twice and I can't approve comments until I'm on my lappy usually after the kids go to bed (late!) at night! So don't worry if it doesnt appear straight away, just check the next day as it should be there then.


Photobucket


We're sponsored for this challenge by Donna's Den of Crafts and have a £10 gift voucher to spend in her online shop. Donna's Den stocks a range of items including brand names like Smirk, DCWV, Dovecraft and My Craft Studio, with lots of little treasures and goodies to be found. Pop over to have a look!


Donna also runs a challenge blog exclusively for Mens/Boys cards. We all have to do them sometime and she has a fabulous design team with tons of inspiration. Cards for Men challenge blog is here.


Photobucket


CHALLENGE 10 SKETCH


Onto Challenge 10 which is a delightful sketch by our DT member Jenny. Remember sketches are open to interpretation so I'd also like to see some spins on it! If you've never done a sketch before then there is a tutorial here. Debbie our special guest had never done one either and has aced it so have a go with nothing to fear :)


I hope you have a lot of fun with this sketch as we have and thank you to our Design Team for all the hard work, time and effort they put into making this blog and to our special guests who willingly share their time and skills with us. Have a very Merry Christmas everyone and we'll be back on Dec 28th (Also my birthday yay!) with our next challenge.


Here's what our Design Team have created for this challenge. Thanks very much ladies and have a lovely Christmas x


Judie


I have used different coloured pink squares, attached some acetate for the middle square and two different sized circles, i have added the letters to spell girl around the card. I have used my distress ruler to add a bit of depth to the card. Enjoy everyone


Julie


I started with a blank square card, cut the mirror card to size and stuck onto the card added the strips of messages. I then used some snow effect 3D card which I have had for a while the 3d effect does not show very well. Not having a circle cutter I cheated a little and drew around a roll of double sided tape to cut out the larger of the two circles, I then mounted the circle picture that I had chosen. I finished off with the sentiment and some gems.


Lisa


Mandy


I used the sketch as a layout inspiration for an A5 card. The base was made from an A4 sheet chocolate coloured cardstock with papers from Basic Grey Cupcake pack.
The matted layers were cut using Nestabilities dies. The stamped image is from Lili of the Valley and is the perfect image for my car game mad hubbie's birthday card. I have coloured the image with Promarkers and Sakura pens
The gift parcel in the top corner is a cardstock sticker from the paperpack. The sentiment in the bottom corner is a Letraset rub on and I have added Stickles glue to add some highlights to the patterned paper.


I used Prickley Pear Rubber stamps for my images and Melissa Frances paper. I glittered up the image the Poinsetta image after I colored it with Prismacolor Markers. I sprayed the entire card lightly with Gold Glimmer Mist.


Vix


For this sketch I've used an image by The Greetings Farm called Summer Fairy. I coloured with promarkers and much use of the blender for lighter shades and a copic spica glitter pen on the wings then used heritage shimmer ink in light and mid blue around the image and edges then very gently with a black brilliance blending in towards the centre. This was mounted on silver paper and like Julie I don't own nesties etc so used a CD as a stencil instead :) The image itself holds a flower so I've added a flora doodles one with a large bead cap, a spacer and a crystal gem brad through the centre to add more dimension with 2 small chains and a glass heart bead and made with love charm. (Tip: If you struggle to get the brad through the bead caps give it a nip with a cropodile or very gently twist the brad till it goes through)

The 4 squares backing paper is a printout from designer extreme vol 3 and I added a square of blue card beneath the circle that matches the base card and stamped around the corners with a star stamp from Tracey Coates' butterfly beauties sheet. The sentiment is from Tracey's Starburst Fairies.


Now may I have the pleasure of introducing our special guest for this challenge, Debbie Dolphin! Debbie has a project in the current issue of craft stamper magazine which is also a great idea for those last minute gifts. She is lucky enough to work at The Stampman and has produced some beautiful designs using their stamps, hop over to her blog and check them out!


SPECIAL GUEST DESIGNER - DEBBIE DOLPHIN

My name is Debbie Dolphin. I am married with two kids, a boy of 13 and a girl 10. I have from a very early age been interested in crafts, being the daughter of a Brownie Leader! I just love things that are handmade. It was probably about 10 years ago now that I walked into The Stampman in Skipton where I saw a man demonstrating with Gold powder and a heatgun and was just gobsmacked with the results and have been hooked ever since. I just couldn't keep away from the place and have worked for them for the last 7 years. I love it though unfortunately I tend to spend my wages there most weeks. No wonder they offered me a job!! hee hee


Recently I have featured in the latest copy of Craft Stamper which has been something I have always wanted to do.

Monday 30 November 2009

Challenge 9 - Alternative Christmas

Thank you so much for you entries into our previous challenge (8) Clear as Day, there were so many beautiful entries using a huge variety of techniques and it was an absolute pleasure visiting you all. Judie, Julie and myself have chosen our Top 3 this week (one each!) and we'll be back with that and the winner of the fabulous Tracey Coates stamp plate later on! Did any of you catch Jill & Tracey on C&C this saturday, I know Lilac anglia did as I heard her email read out! If you like Tracey's stamps pop over to her blog as she's looking for suggestions on new designs!
******************************************

WINNERS OF PREVIOUS CHALLENGE (8)

I've counted 26 entries including 2 email, they are listed in the comments box below the previous challenge. The winner of their choice of one of Tracey Coates' fabulous stamp plates is......

Number 25 - Crafty Kitten! Well done sweets, please email me!


Our Top 3 this challenge was a joint effort between Judie, Julie and myself and we chose one each so here are our choices!


Judies Choice - Sophie

Julies Choice - Gloria

Vixs Choice - Janine Q


Well Done ladies and lil cherub! Janine will have to get herself a blog now as she is an email entry and what a corker it is too!! Julie kept going back to Glorias and saying yep, definately THAT one and Judie had no idea that Sophie is Julies daughter (shows how much attention she pays in class eh lol lol!)

Grab yourself a well earned blinkie from the sidebar!


**************************************************
Onto Challenge 9 which is sponsored once again by Joanna Sheen. Joanna was also on C&C over the weekend, her shows are so inspirational too and lovely products. New in her shop this month are the Promarker gift sets whoop whoop! These are specially selected packs of 12 promarkers in various themes, also containing blender pens, a wallet, fineliner and bleed proof marker pad, fantastic!

There are also some extra extra cute house mouse decoupage sheets new in stock, go take a peep as these are gorgeous!


CHALLENGE 9 - ALTERNATIVE CHRISTMAS


A what what you say? Alternative Christmas, we would like you to look at your products with new eyes for this challenge and jump right out of the box instead of just thinking outside it :D


You can take this either way, I don't mind what you choose so our challenge is to.....

1. Create a card/layout/project etc using christmas images in NON TRADITIONAL COLOURS so no red, green, gold combos on a christmas image. I know some of you will take to this like a duck to water as Ive already spied some of you doing it. Have a try at lilac themes, blues, pinks anything but red/green/gold

OR


2. Alternative route is to use a NON CHRISTMAS IMAGE using TRADITIONAL COLOURS so maybe look at your sumer tildas and do them in traditional red/green/gold. I know this works very well for the shopping Anyas.


OKies, have fun with this one! Our ladies have been really busy with xmas preps so I'm very pleased they managed to fit the challenge in too, thanks girls x


Jenny


Papers from pink petticoat tis the season, purple mirror card, black mirror card sprayed with crafters companion gold spray & sparkle, mediallion peel off layered on to mirror card and cut out, peel offs from stash.


I used a square white card and then stuck 3 oblongs of pale mauve paper at the top, left hand side & the bottom.I then used part of a blue card kit which I have bought from craftsuprint, printed and cut out a second black snowflake which I stuck on top of the original one using foam pads, the box with the sentiment is part of the kit and I added the words from my stash. I also added some glitter silver snowflakes to give it some more depth & interest.


Judie


I have chosen to do the christmas card with the non traditional colours - I am out of favour at the mo with images and colouring, so I have chosen to stamp & emboss a border stamp that I have - I mixed the emboss powder with glimmer powder so that it gives it a different kind of shimmer. I have used my ruler that I rip and distress paper with to make the edges on my card a bit different, I lined it up and used a blue metallic pen to make the edges untidy. A good way to make your christmas cards without knowing.


Julie


I started with a C6 deckled edge card, the rest of the card is basic matting and layering with the cute topper. I printed the greeting on the computer with a frame to personalise the card a little more. I added the gems and also a little decoupage to the picture which is not very clear from the picture. Enjoy this challenge good luck x


The image is a digi-stamp from Pink Cat Studio, coloured with promarkers and with lots of glamour dust. The papers are My Mind's Eye, with some sparkly blue cardstock from my stash. Computer generated sentiment. The snowflake was cut with the cuttlebug icicle die and then coated with glamour dust. Added some large pearls to the snowflake centres on the image and on the cuttlebug snowflake.


Mandy


Base of card is an A4 sheet folded in half. The patterned paper is from the DCWV Rose Tinted Christmas stack.
Stamped image is Penny Black coloured in with Promarkers, fur trims are Woodware fluffy stuff covered with glitter and heat embossed so it puffs up. Image has been cut out using a Nestabilities die and matted onto metallic card. The whole image is mounted onto 3d foam.
A second strip of card was punched using the Fiskars scallop edge border punch and the bobble trim is from Doodlebug. Added embellishments are Craftime glittered snowflakes and pink gems from Paperchase.


Rose


Stamps - Magnolia Edwin Sledging and Art Impressions Small Snowy Tree
Copic Markers - E57 Light Walnut, E47 Dark Brown, E37 Sepia, E00 Skin White, E21 Baby Skin Pink, Y11 Pale Yellow, Y08 Acid Yellow, Y17 Golden Yellow, R20 Blush, B22 Phihalo Blue, B93 Light Crockery Blue, B45 Smokey Blue.
Card - Stampin Up Whisper White, Pretty in pink, Bashful Blue
Stampin Up Stampin Pastels
Stickles - Diamond, Stardust, Eucalyptus, Green
Post It Notes or Eclipse Tape
Clear Stardust Pen
Snowflakes and Bow
Hair Spray


I stamped Edwin onto White card as well a piece of eclipse tape to use a a mask on the white card. I then stamped a series of trees as a background. I used the same method as for Edwin and created mask of the trees as well. I create a sky using pastels that I sealed with Hair Spray. I removed the masks from the trees and added snow to the sky and trees using Stickles. i also added green to the Branches. Once dry I removed the mask from Edwin and coloured him in using Copic markers. I added highlights using clear stardust pen. I rounded the corners of the white card and edge using a blue Copic pen. I mounted it on to a piece of pink card also with rounded corners. Which was then mounted on to a card created using a sheet of A4 blue card folded in half. Added some snowflakes and a bow. I rounded the corners of the card and also edge using the same blue card.


Vix


I cannot begin to tell you how special this stamp is! I've written a whole lot about it over on my blog . It is a custom made stamp of my great grandmother, aunt Geraldine, my father and my grandmother (Nan!) that has been stamped onto starburst stains in cathedral pines green, peony scarlet red and winter jasmine gold using them as sprays by changing the dauber caps. I embossed with black sparkle powder making an easel card. The papers are printouts from Bearly mine designer extreme vol III and the poinsettia is from a simple expressions plate coloured with promarkers which I've made 3d.


I've added an embossed panel on the base and used metallic rub ons in the corners and added 2 holly brads, I think they're HOTP as Ive had them ages. I curled them up with a pair of pliers to act as the stopper.


Now I'll hand you over to our special guest for this challenge and what a treat she has made! Jo Capper-Sandon might be familiar to Craft Stamper readers as she is featured regularly and has a certain skill with making things out of everyday objects found around the house or outdoors. She is on the design teams or makes samples for....Art Journey Craft Stamper Crafty Individuals Gingersnap Creations Happy Daze Paper Artsy Paperbag Studios Stampotique Originals The Artistic Stamper so we are very honoured to have her here, thanks a million Jo x


SPECIAL GUEST DESIGNER - JO CAPPER-SANDON - JO BLOGS


Friday 27 November 2009

TUTORIAL - STAMPING - MASKING

You may have heard the term "Masking" but aren't quite sure what it is or you may have seen images put together with no overlap of lines and wondered how its done so we'll show you how!

This technique is called Masking as it hides (or masks) another image you can overstamp.

You will need your stamps and some post it notes. A piece of paper is fine but post it notes are tacky on the back allowing you to stamp without the mask moving giving you both hands to work with.

You need to decide on your image layout, what is going to be the furthest away object and which is the nearest? Start with your nearest object, in this it is the lady in the lake.

Stamp into your blank card and then stamp again onto your post it note and cut the image out as close to the lines as you can get it. Try and make sure part of your image is stamped where the tacky bit is on the back as this will hold it in place.

Place your cut out mask over your stamped image as below. This will allow you to stamp objects further away without leaving lines over your original image.


Stamp your next furthest image where you would like it as the picture below shows. Continue with masking your next layer if you wish to add more images as I have done with the mountain in the background.


The finished item. You may notice a slight gap around the lady, I didn't cut close enough which will leave a gap like that so its important to cut as close to the lines as you can.


Here's another example of masking that Lisa did for our stamping challenge 7 without the gap so you can see the difference (plus she did a better job of it lol!)


Monday 16 November 2009

Challenge 8 - Clear as Day

Wow sooooo many entries for Challenge 7 Stamp Something THANK YOU and I'm so glad lots of you took the extra challenge and gave your heat guns a run out or did something a bit different! Thank You again to Joanna Sheen for sponsoring us and also to Beth for being our special guest.

I must apologise for not doing a tutorial as planned this week as I've been poorly ick ick so I will catch up with more stamping tricks and techniques as soon as I can!


********************************************


WINNERS OF CHALLENGE 7

Its taken a long time to get round to this because there were many duplicate entries. Just a quick reminder that we have a maximum of 3 entries per challenge rule as not everybody is a super fast crafter so it makes it fair all round. If you entered more than 3 cards in challenge 7 then anything after your 3rd entry is not counted, sorry. I've had to check, recheck and check again to make sure the numbers are correct and I make it 85 valid entries so here goes!

The winner of the Joanna Sheen £10 voucher is.....


Which makes it Carolyn! It must be your lucky day because you've also been picked for the Top 3, well done you! Please email me your address :)


Our Top 3 choice for this challenge are in no particular order...

Carolyn - PMS etc


Anne - Anne's hobby blog


Caro - Crafts & Life


Well Done ladies and please grab yourself your blinkie in the side bar!


Also a very special mention to Scott, Ruby, Sophie & Rachel our younger crafters who've taken part in recent challenges. Its lovely to see young crafters and we hope to see more of you!


***************************************************


Okies onto Challenge 8 - Clear as Day.

What we'd like you to do is include some thing clear, transparent or translucent, something see through.

You can alter it so for example use inked acetate (it *was* see through now it aint!) or go the simple route and include clear sticky gems (My fav!!) Remember you can always colour in clear sticky gems with your promarkers/copics so they match your image ;)
Try making some fairy or butterfly wings from fantasy film or similar. There are lots of possibilities on this one so we can't wait to see what you come up with!

And the prize??? Ooooh I have a special treat for you! Some of you may know that I have been asked to join the Design Team over at The Stampman who sell some of the most amazing stamps and products, please go and check them out as its like Aladdins Cave!

One of their newer additions are a range of stamps by the talented Tracey Coates and the prize we're offering is to choose one of her 3 new plates. You can choose either Butterfly Beauties, Starburst Fairies or Classical Instruments it will be your choice! I love them all personally so I couldn't select one to put here so thought you might like the choice yourself! Also watch out for them on Create & Craft TV on 28th November!

As an extra treat I am also offering some Moonglow blog candy over at my Blog, pop on over to enter!


or


or


Lets have a loosie at what the Design Team have created for you this challenge! We've all had a lot of fun with this one and hope you do too! Please leave your entries in the comments box below Cath's card by 12 Noon GMT Monday 30th November, good luck!


I ran a piece of acetate through the cuttlebug using the Happy Birthday Folder. Then I cut the front off of a card blank leaving a small section to stick the acetate to. I covered the inside of the card with paper from Papermania Sweet Nothings range and then stamped and embossed the central image twice, cutting out the central section to decoupage onto the base. I coloured the image with Whisper pens and Sakura pens


8" card blank, 3 shades of purple card for matt & layering, nestabilities for the circles, rub on sticker, double sided tape for the glitter borders, acetate wrap stuck down, butterfly stickers on the acetate.


I used a kit I bought from Studio (Religious Mini O4) this has 3 pieces which fold together, the first two had circles and are in silver an the inside of the card is white.
As I really didn't know how to use this type of card I drew round the circle so it that when I added the pieces on the inside of the card they could be seen through the circle in the 1st two pieces.
Next I put a piece of acetate between the 1st two pieces sticking it onto the card using double sided tape, and put another strip to hold the 1st piece of card inside.
The various pieces were then stuck in or near the circle & I added a gold fluorescent star between the two towers. On the cover, I added 3 stars in each of the top two corners and added an Anita's Seasons Greetings sticker


Judie


This challenge had my brain working overtime, i had a thousand ideas and didnt know what to pick, I used some hard cardstock and cut out a rectangle shape in the middle on both sides of the card. I then attached acetate to the front and the back, running up the middle is a pink ribbon which has three, shrinkle flowers on, i punched them out first and coloured them and then shrunk them down, I punched out several different coloured flowers and attached them to the front of the card and added glitter to beef it up a bit. thanks for looking


I used a kit I love which I purchased from QVC, it is a Kanban kit. The aperture cards came with it and just needed the centres popping out. I then cut and stuck the acetate in the middle of the card, the toppers are decoupaged but it is hard to photograph them, I then added the gems and snowflakes. It is a easy card to make from kit form but I really love them I think they are so cute.


I've used the Elzybells 'polar bear' teddy stamp, coloured with promarkers, with a chalked sky background. I used a sakura clear glitter pen on the little falling snowflakes and polar white flowersoft for snow. I've cut the image out with a Nellie Snellen circle die and the paper is Papermania 'naughty & nice Christmas'. I've used a Sizzix Bigz die to cut some acetate flowers (mainly because I couldn't get my snowflake die to cut through the acetate!), then added lots of glamour dust and some buttons, and finished off with a strip of pink & blue fibres.


I trimmed a card blank down leaving a 2cm strip at the front. I used a Fiskars punch to make a decorative edge. I ran a piece of acetate through a snowflake Cuttlebug embossing folder and used double sided tape stuck it to the inside of the overlapped front edge.

The paper on the inside of the card is a piece of wrapping paper from Paperchase. They do some fantastic metallic and flocked designs and around £1 to £2 for a massive sheet they are very good value too.

The large snowflake is a 2 step Cuttlebug die that punches and then embosses the shape. It is cut from Doodlebug flocked cardstock so feels like Fuzzy Felt :) The ribbon is a self adhesive one from Papermania, the gem is Paperchase and the sentiment is from Kanban.


I created an Easel card and the butterfly is Acetate. I don't know how well it shows in the photo. I took a couple of close ups that I will put on my blog. I used the Mimi image from Pink Petticoat Designs. I love these Easel cards, really fun to make!


I stamped a Cute companion stamp from Christmas Magic set, the using black Memento Ink. Which I coloured in using watercolour pencils and add a chalk background to the bauble.
Then I stamped the same image using stazon on to acetate. Then added stickles to the snowflakes. I cut out a frame using a scalloped nestabilitiy die. I glued the acetate bauble to this frame.
I then matched up the coloured bauble up with the acetate bauble, then mounted it on to a red card.


For this challenge I have created my very first Easel card whoop whoop! They are soooo simple once you make the base you realise is that IT! I shall put destructions on my blog if you don't know how to make them. The papers I used are from Bearly Mine designer extreme volume III and I stamped Tracey's Butterfly from the Butterfly Beauties plate onto acetate, flipped it over and added some glamour dust to the back using a clear glue. I used the wing of the smaller butterfly to create the corners and also glamour dusted them. This was secured onto the backing papers with brads. The butterfly at the bottom was made by swiping a tri colour brilliance inkpad onto card and stamping and cutting out two butterflies, making the top one 3d.


Now its my absolute pleasure to introduce you to one of my oldest crafting friends (not that she's old, I've known her a long time is what I mean lol!) Cath used to run a superb shop called Katy's Corner and has appeared regularly in Craft Stamper magazine with some fabulous projects. Her blog is full of tutorials and tips so go and take a peek as its jam packed with ideas!


Cath has created a card using a "Caught in Crystal" method which involves floor cleaner, tissue and reinkers and anything else you'd like to chuck on too! I actually own this card, its miiiine all mine mwhahahaha! I shall put the technique up on here as soon as I can!


EMAIL ENTRIES

JANINE Q


OOOh check this out by Janine Q who is in the process of starting her blog! I think she's going to do very well around blogland!

HELEN C

Fab little delicate acetate card by Helen C, well done!